In this blog, I will be covering the push of data from a flat file to Oracle table. Since there are a lot of snapshots and I will not be able to do justice to all of them in a single blog, I will be spreading out the blog posts in a series of 5 posts.
The 5 posts that will cover the loading flat file into Oracle using ODI is as follows: -

I launch the ODI Studio and go to the Topology tab.
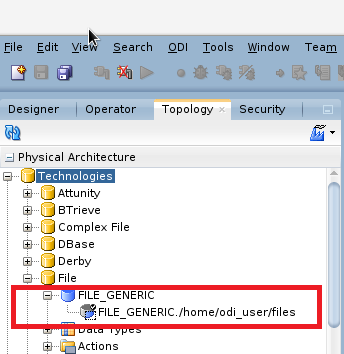
Now, expand the Physical Architecture button in the Topology tab. This is shown in the below snapshot. This will show the list of all the physical systems that are supported for ODI.

Expand the File button and click on the FILE_GENERIC button to configure the properties for the file. This will show the properties of the FILE. This is shown in the next snapshot.

I enter the Host (Data Server) as localhost since the file is present on my local machine. The Connection details can be left blank for localhost since it is not needed.

The connection details are useful when you have a FTP path where the files would land. For that the user name and password are useful.

I keep the Physical Agent as “Local (No Agent)” and hit on the Test button to test the connection.
The connection is successful as shown in the next snapshot.

The next step is to create a Physical Schema in the Physical Architecture. This is done by right clicking on the “FILE_GENERIC” tab as shown in the below snapshot.


On clicking the Save button, I get an Information dialog saying that Context is not specified for this schema. I click on the OK button to save the Physical Schema details.

The updated Physical schema is as shown in the below snapshot.

In the next blog, we will see how to create the Logical Schema and the data model for the File.
The 5 posts that will cover the loading flat file into Oracle using ODI is as follows: -
- Creating a Physical Architecture and Physical Schema for File.
- Creating a Logical Architecture and Data Model for the File.
- Creating a Physical Architecture and Physical Schema for Oracle database.
- Creating a Logical Architecture and Data Model for the Oracle database.
- Creating a mapping to push the data from the File to Oracle table.
So let’s begin…
The below snapshot shows the file that I want to push into the Oracle table. This is present in a folder /home/odi_user/files which is the landing zone for all my flat files.
The below snapshot shows the file that I want to push into the Oracle table. This is present in a folder /home/odi_user/files which is the landing zone for all my flat files.

I launch the ODI Studio and go to the Topology tab.
Now, expand the Physical Architecture button in the Topology tab. This is shown in the below snapshot. This will show the list of all the physical systems that are supported for ODI.

Expand the File button and click on the FILE_GENERIC button to configure the properties for the file. This will show the properties of the FILE. This is shown in the next snapshot.

I enter the Host (Data Server) as localhost since the file is present on my local machine. The Connection details can be left blank for localhost since it is not needed.

The connection details are useful when you have a FTP path where the files would land. For that the user name and password are useful.
The next thing to do is to test the connection to the server. This can be done by clicking on the “Test Connection” button in the above snapshot. A window pop ups as shown in the below snapshot.

I keep the Physical Agent as “Local (No Agent)” and hit on the Test button to test the connection.
The connection is successful as shown in the next snapshot.

The next step is to create a Physical Schema in the Physical Architecture. This is done by right clicking on the “FILE_GENERIC” tab as shown in the below snapshot.

On clicking the “New Physical Schema” a window will pop up and you will be asked to configure the properties for the Physical Schema. I configure the directory as shown in the below snapshot.

On clicking the Save button, I get an Information dialog saying that Context is not specified for this schema. I click on the OK button to save the Physical Schema details.

The updated Physical schema is as shown in the below snapshot.
In the next blog, we will see how to create the Logical Schema and the data model for the File.
No comments:
Post a Comment