Well, first things first… The title of this blog is quite a mouthful… Unfortunately, I guess I cannot condense it any more or rather my mind is too tired… So, let the games begin. Well, in this blog, I would be talking about initializing the Master repository, creating a work repository and then connecting to the work repository in Oracle Data Integrator… In my previous blog, I had shown the steps to create a master repository in ODI… This just follows up on the same thread...
The below snapshot shows what happens when I click the “Connect to the repository” button on the upper left corner in the below snapshot…

Since I have not created any login name after setting the master repository, the login name field is blank. I click on the green plus button in the above snapshot to add a connection to the repository.
One clicking the button, the below snapshot opens up which contains the repository connection information.

I give in a login name and key in the user name and password for the ODI connection. I am initially connection only to the Master repository. I also populate the details of the master repository like the user name and password for the database, along with the driver and the URL for the getConnection method.
On clicking the Test button, the connection is established successfully as shown in the below snapshot.
 Since the connection is fine, I click on the OK button to close the popup dialog and click on the OK to save the repository connection information.
The configuration utility asks me how I would like to store the password. I choose “Store password without secure wallet” as shown in the below snapshot.

On clicking the OK button, I am through into ODI master repository.
The next step is to create a work repository. I click on the Topology tab and expand the repositories section as shown in the below snapshot.

I right click on the work repositories to create a new work repository as shown in the below snapshot.
 The first thing the wizard asks me is the connection details which I key in as shown in the below snapshot. I test the connection and it works successfully.
 On hitting the Next button, it gives me a warning saying that localhost or 127.0.0.1 should not be used. Since this is a demo install, I ignore this error and continue with the repository creation.
 The next step is that I am asked to set a password for the work repository as shown in the below snapshot.
 On clicking the Finish button, the work repository creation is triggered as shown in the next snapshot.

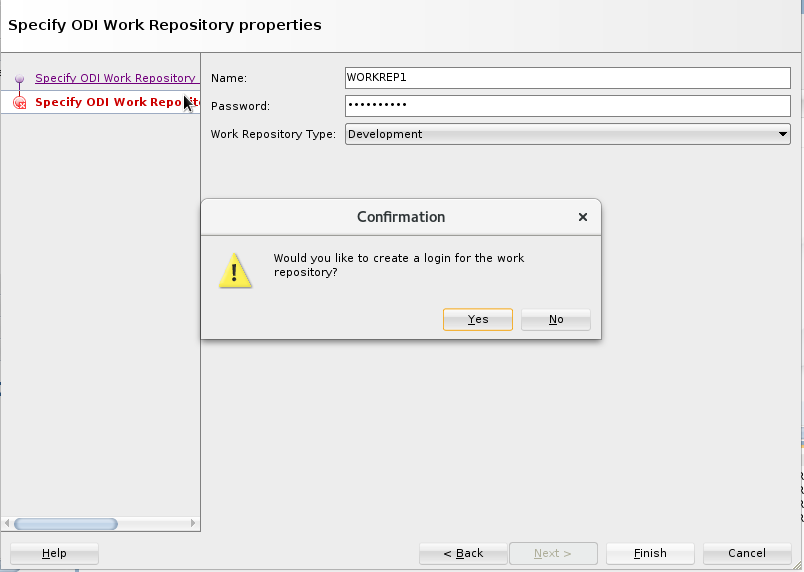
Once the work repository is created, the wizard asks me if I want to create a new user for the repository. I say no and exit the wizard.

I go to File->New and click on the create a new ODI repository Login to create a login user for accessing the repository.
 I key in the details as shown in the below snapshot. Name is ODI_DEVELOPER and I am connecting to the Work repository only.

On clicking the OK button, I am connected as shown in the next snapshot.

In the next blog, I will show my first ODI mapping where I move data from a flat file to Oracle table.
The below snapshot shows what happens when I click the “Connect to the repository” button on the upper left corner in the below snapshot…

Since I have not created any login name after setting the master repository, the login name field is blank. I click on the green plus button in the above snapshot to add a connection to the repository.
One clicking the button, the below snapshot opens up which contains the repository connection information.

I give in a login name and key in the user name and password for the ODI connection. I am initially connection only to the Master repository. I also populate the details of the master repository like the user name and password for the database, along with the driver and the URL for the getConnection method.
On clicking the Test button, the connection is established successfully as shown in the below snapshot.

The configuration utility asks me how I would like to store the password. I choose “Store password without secure wallet” as shown in the below snapshot.

On clicking the OK button, I am through into ODI master repository.
The next step is to create a work repository. I click on the Topology tab and expand the repositories section as shown in the below snapshot.

I right click on the work repositories to create a new work repository as shown in the below snapshot.


Once the work repository is created, the wizard asks me if I want to create a new user for the repository. I say no and exit the wizard.
I go to File->New and click on the create a new ODI repository Login to create a login user for accessing the repository.


On clicking the OK button, I am connected as shown in the next snapshot.

In the next blog, I will show my first ODI mapping where I move data from a flat file to Oracle table.
No comments:
Post a Comment