Tuesday 28 March 2017

Hyperion Error while starting up Embedded Weblogic server- Server subsystem failed.

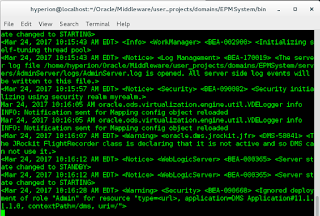
In this blog, I would be talking about an error I encountered while trying to start up my Embedded Weblogic server in the Hyperion environment using the startWeblogic.sh shell script. The error that I encounted is as shown in the below snapshot.

The error is something of this sort:
<Critical> <WeblogicServer> <BEA-000386> <Server subsystem failed. Reason: java.lang.NumberFormatException: null
(The reason I am drafting this is more for the sake of nostalgia…Whenever you start exception handling in Java, the first exceptions you handle are either ArrayIndexOutOfBounds exception or the NumberFormatException…)

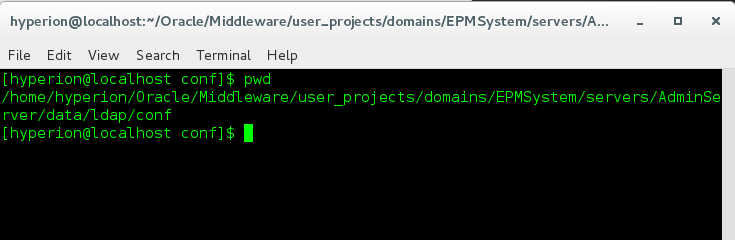
The error is because of a bad configuration file present at the <EPM Instance Home>/domains/EPMSystem/servers/AdminServer/data/ldap/conf/ path.

The path in my environment is as shown in the below snapshot.

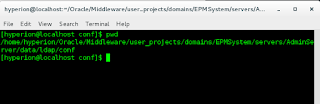
The file name is replicas.prop.

In order to fix the error, all you have to do is either delete/rename the replicas.prop file to get Weblogic up and running.

I renamed the file and on running the startWeblogic.sh command, got my server up and running as shown in the below couple of snapshots…


Thursday 23 March 2017

Reinstallation of Hyperion EPM components stuck in “Create Oracle Inventory” phase on Linux box

In this blog, I would be talking about a strange issue I encountered yesterday when I was trying to install additional components on my Linux Hyperion environment. It is actually an interesting issue since while we know the way installation usually works, we never really fully appreciate the beauty or the complexity that is hidden behind that simple jar files and UI.

So here it goes. I had installed Essbase and Planning on a Linux box. Due to some oversight on my part. I forgot to install FDMEE which I would be needing to move data around. So I brought down my environment and decided to install the FDMEE components. While the installation was successful, the installer got stuck while creating Oracle inventory as shown in the below snapshot.


Generally this takes some time and when I checked the logs at backend it looked like the process was running as well. But my hunch was that the process was stuck. So I jumped onto the Oracle site to see if anyone else has encountered similar issues since I had done reinstallation multiple times on Windows machines and it had never got stuck.

The catch is that the issue is specific only to Linux machines and is documented on Oracle site. And the fix for it is so simple that its funny. First thing I did was uninstalled the FDMEE component.

The reason why the process gets stuck is because of the unzipping of the zipped files in the common Oracle patch folder.

The below snapshot shows the <MIDDLEWARE_HOME>\oracle_common\OPatch\Patches folder.

All you need to do to get the install up and running to completion is rename the top four folders in the above patch folder. That’s it. You need to rename the patch folders with patch numbers 16964825, 17178347, 18514458 and 20326778.

The below snapshot shows the folders after they have been renamed.

I now run the install of FDMEE once again as shown in the below snapshot.
And this time the Oracle Inventory process runs to completion as shown in the below snapshot.
If you check the Patches folder, you will see that the same four patch folders have been unzipped successfully.

Installing the Hyperion EPM Homepage for Hyperion Workspace

In this blog, I would be talking about installing the Hyperion EPM homepage. This is one of my shorted blogs. While personally, I don’t particularly like or dislike the Hyperion EPM homepage, since I usually setup one of my research apps to be shown by default. But if you have access to multiple applications, it is a good idea to have a one-window view of the entire system so that navigation is a bit more simpler.

This is how my Workspace page looks like when I log in.
The environment had Essbase, Planning and FDMEE installed. The entire screen is a big blank slate which looks a wee bit empty. In order to configure the EPM Homepage, you need to install Reporting and Analysis Framework components.

The Framework components are made up of two set of components:
  • Framework Java Web Application
  • Framework services and common libraries.
The following snapshots show me doing the installation of these Framework components. 


The configuration of the Framework components is pretty straightforward and you just deploy it onto the application server.
 
The following snapshot shows my Workspace page now with the Homepage up and running. 

The applications would come under the Quick Links and would be grouped by application type like Planing, Profitabilty, etc. A neat bird-eye view display of the Hyperion EPM infrastructure you have access to.

Tuesday 21 March 2017

Loading Text data in Hyperion Planning using Planning load utility

In this blog, I would be talking about using the Planning load utility to load text data into a Hyperion Planning application. Now, in one of my previous blogs, I had explored how to manipulate the backend tables to do this. Using the outline load utility is a simpler way since once you get the format up and running, you can basically generate all the extracts as you want. (My requirement was that we were trying to create a spreadsheet view of the data and since the intersections/POV remain the same and only the Account member and associated data keeps on changing, using an ETL tool to generate and load this file is a simpler and cleaner approach)

The below form shows the data/intersection where I want to load the data.

Now, rather than preparing a flat file and loading the data, I prefer to use reverse engineering. Reasoning being that if the extract comes out in a specific format, probability supports that the same engine should load a suitably modified file import back into the system.

The next snapshot shows me extracting data from the planning application using the utility.

As shown in the above snapshot, I specify the Plan Type, Accounts in Rows and Columns should have Entity. Then I specify the POV that I want to extract…

When I run the extract, I get a warning and fails as shown in the below snapshot…

The error says that “The density for Driver dimension for a specified plan type must be dense.” Since Entity is sparse, it errors out. Driver dimension is the one that comes along in the columns.

I now update the format as shown in the below snapshot, by putting Period in columns and moving Entity to the POV. 

When I run the utility, it runs the extract correctly as shown in the below snapshot.

The format of the file is as shown in the below snapshot.
The extract is made of up four logical columns:
  • The column 1 specifies the members you specified on the Row.
  • The column 2 specifies the members you specified on the column
  • Column 3 represents the POV of the data.
  • Column 4 represents the Plan type from which data was extracted.
I now update the comments for BegBalance as shown in the below snapshot. 

I now run the utility data import utility with parameters as shown in the below snapshot. 

Observe that “Dimension to Import” is equivalent to the member you specified on Rows and the “Driver Member Specification” is equal to the member you specified on column.
 
On running the utility, the file is successfully loaded. 

The value is reflected correctly as shown in the below user form. 

Thus, a simple way to load data into Planning, especially text data since once you get the format right, it is just a matter of manipulating the fields you require.
 
P.S. : I used Oracle Data Integrator to generate the file from a relational system. It makes for a very clean solution and once you have a sample format ready, it is just a job of mapping the fields and getting the remaining columns using plain old SQL. As they say, beauty lies in simplicity…

Sunday 19 March 2017

Using MOBAXTERM for doing a Hyperion EPM install on a Linux box

In this blog, I would be talking about doing the Hyperion EPM install on a Linux box using MOBAXTERM which is a terminal emulator and a lot more. For more details about MOBAXTERM, you can follow the links below:

http://mobaxterm.mobatek.net/

In one of my previous blogs, I had shown how to do the install using Putty and XMing (http://exploitsinhyperion.blogspot.in/2017/01/installing-hyperion-epm-on-linux-box.html). The reason we needed some elaborate configuration for Putty is because, Putty by default does not come with an XServer. Thus you need to configure an external system for handling the XServer which is done by XMing. However, MOBAXTERM is an all-in one Swiss knife so you don’t need to do any extra configuration.

The install file is a simple zipped file that you need to extract. In this case, I have extracted it onto the Desktop as shown in the below snapshot.

On opening the terminal the window that appears is as shown in the below snapshot. MOBAXTERM imports Putty settings by default so you can see the RedHatLinuz connection is imported by default.


The settings for the connection is as shown in the below snapshot.

On clicking on the connection, the system asks me for login details which is similar to what is shown in Putty. This snapshot is shown below.

I am able to login successfully as shown in the below snapshot.

In the above snapshot, X11 is disabled on the Linux box by default. Also observe, the value of the DISPLAY is the IP of my Windows box. You would need to export this as a DISPLAY variable in the Linux environment so that X11 forwarding takes place. This is shown in the next snapshot.

I now run the install shell script and this is shown in the below couple of snapshots.


I get a popup warning asking me if I want to enable the remote computer to send the graphical controls onto my Windows box. This is a defensive programming bit on part of MobaXterm.

I choose to accept the Incoming connection and the installer window opens up as shown in the next couple of snapshots.


Now from an ease of use perspective MobaXterm wins hand down since we don’t need to do any additional configurations nor install additional software since it is an all-in-one tool. Putty on the other hand requires us to install XMing and configure the environment for X11 display. However, since MobaXterm is not a freeware as such you may not be able to install it since many organizations would not have this software listed as an acceptable software to be installed.

Tuesday 14 March 2017

Exporting Shared Library in Hyperion EPMA using EPMA File Generator

In this blog, I would be talking about exporting Shared Library artifacts in Hyperion EPMA using the EPMA File Generator. It has been some time since I worked on Hyperion EPMA and while there are some things I find to be very good about EPMA, one of the pain points has always been manipulating the strange ADS files.

The below couple of snapshots show the Dimension Library and me creating a sample Period hierarchy in the Shared Library.


Now the motivation of exporting Shared Library. I wanted to configure the Interface data sources and see how the Interface data source works. Rather than creating everything from scratch by way of insert/sql statements, I could easily just load these records into a table using some front end tool and test it.

Now in order to export the Shared library, I open the EPMA file generator utility. The utility after startup is as shown in the below snapshot. 

Click on the “From EPMA application tab” in the above snapshot. After opening up the tab, the window is as shown in the below snapshot.

Enter the user name and password. The EPMA URL will be based on the environment.

In place of the EPMA application name, enter “MASTER”. This refers to the Shared Library.

Choose a file to save the ADS file for the export. This is shown in the below snapshot.

Click on the Execute button to extract the Shared Library into flat file.

The snapshot of the utility after generating the ADS extract successfully is as shown in the below snapshot.

The snapshot of the file exported is as shown in the below snapshot.