In this blog, I will be talking about how to create a data source for a relational system on a Linux machine and using this data source for fetching data into the Essbase rules file. Generally, creating a data source in a Windows machine is fairly simple since you have access to the GUI. In Linux, this is a bit tricky since this configuration needs to be done in an initialization file. The best part of this is that this file is mostly hidden so it does not show up if you do a ls command.
The next snapshot shows me creating a sample metadata table in Oracle.
 The above table has got three fields, PARENT_NODE which specifies the Entity parent member, CHILD_NODE specifies the Entity child member and the ALIAS_DESC which specifies the alias of the child node.
I now insert a couple of records into the table. This is shown in the below snapshot.
 The data in the table is as shown in the below snapshot.

Now, in order for Essbase to have access to the contents of this table, we need to do two steps.
 There are multiple files and I choose the one which is present in the EPM home. (Remember that, very rarely would you find that the database and Hyperion are present on the same server. They will be on separate machines and you will need to choose the one on the local machine or on a server for configuration)
A simple cat of the tnsnames.ora file is as shown in the below snapshot.
 Since we have now found the tnsnames.ora file, the next step would be to locate the odbc.ini initialization file.
 The file is present at <EPM ORACLE HOME>/epmsystem1/EssbaseServer/essbaseserver1/bin folder.
The file is as shown in the below snapshot.

In the above file, two changes need to be done.
The configuration file is already predefined for a given set of databases and drivers like Oracle, Apache, etc. Which means that all you need to do is update the parameter values to suit your environment. So you can copy paste these sections into the file for your given database, give a new name and update the parameters and it would work.
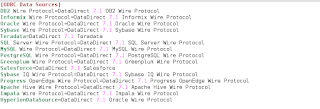
We first update the Oracle database properties. The Oracle Wire Properties section is as shown in the below snapshot.

I copy this and paste it in the file and give it a new name “HyperionDataSource” after which I update the parameters to suit my environment.
(
Note: The parameters for Oracle are defined by two disjoint set of variables in the configuration file, based on whether you directly want to connect to the server or would you like to use the tnsnames.ora file to identify the database connect parameters.
If you need to connect directly, you need to specify the HOSTNAME, PORT and SID variable names.
If you want to connect using the tnsnames.ora file, you need to specify the SERVERNAME and TNSNAMES file name parameter.
Since it’s a local install, I choose to use the first option.
Also, if you give both set of variables values, it will give you an ODBC error on retrieve. )
The HyperionDataSource is as shown in the below snapshot.
 The next step is to create an entry in the ODBC driver for the HyperionDataSource. This is shown in the below snapshot.
 Save this file.
The next snapshot shows me connecting to the SQL window for a rules file.
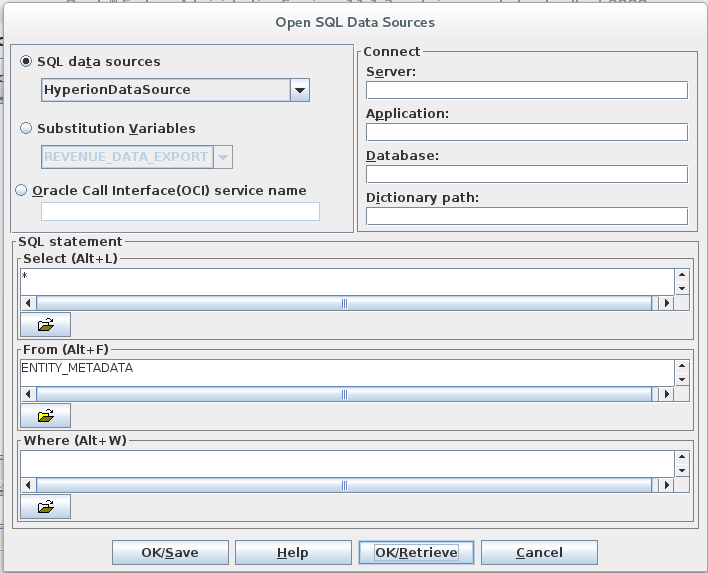
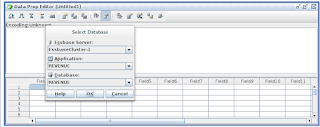 Observe that the SQL data sources lists out the HyperionDataSource as shown in the below snapshot.

I put a simple SELECT * from ENTITY_METADATA for the query as shown in the below snapshot.
 On hitting the Retrieve button, I enter the credentials for the database and the table data is populated as shown in the below snapshot.

The next snapshot shows me creating a sample metadata table in Oracle.

I now insert a couple of records into the table. This is shown in the below snapshot.


Now, in order for Essbase to have access to the contents of this table, we need to do two steps.
- Locate the tnsnames.ora file on the server. This is useful if you have multiple Oracle databases that you want to connect to and helps you from updating the odbc.ini file, which stores the data store information, multiple times.
- Locate and update the odbc.ini file which is used by Hyperion for reading the available data sources in the environment.

A simple cat of the tnsnames.ora file is as shown in the below snapshot.

The file is as shown in the below snapshot.

In the above file, two changes need to be done.
- One is the data source name and the driver it is going to use needs to be defined.
- The second change is that the data source properties like server name, port and SID need to be updated for the database.
We first update the Oracle database properties. The Oracle Wire Properties section is as shown in the below snapshot.

I copy this and paste it in the file and give it a new name “HyperionDataSource” after which I update the parameters to suit my environment.
(
Note: The parameters for Oracle are defined by two disjoint set of variables in the configuration file, based on whether you directly want to connect to the server or would you like to use the tnsnames.ora file to identify the database connect parameters.
If you need to connect directly, you need to specify the HOSTNAME, PORT and SID variable names.
If you want to connect using the tnsnames.ora file, you need to specify the SERVERNAME and TNSNAMES file name parameter.
Since it’s a local install, I choose to use the first option.
Also, if you give both set of variables values, it will give you an ODBC error on retrieve. )
The HyperionDataSource is as shown in the below snapshot.


I put a simple SELECT * from ENTITY_METADATA for the query as shown in the below snapshot.

Great..
ReplyDeleteThank you ;)