In this blog, I would be talking about using environment variables for setting substitution variables and automating your data exports. Well, this is more from the application maintenance perspective. Automating data backups and LCM backups is like a value addition since it basically shows foresight in preparing for that one day when all things go south… Now a couple of disclaimers. The example shown here has been done on a Linux box which is my personal favorite. I like Linux because of the vast array of commands and utilities that it offers at your disposal. The same can be done in windows batch script as well but it is a bit tedious, that’s all… Also, it assumes that you have a fair bit of knowledge about shell scripting…
So let’s begin…
In this blog, we would be creating a timestamped data export file… I personally like timestamped export file since the chances of two processes generating the same timestamp is a quite rare… And when you consider automated processes that generate the timestamps for you, it is very well impossible that you will generate the same timestamp entry on multiple runs.
The below snapshot shows me creating a variable called sibin (pardon me for lack of imagination) and setting its value using the export command.
 A little write up about the export command. Generally, most of the operating systems have something called as scope of variables. Thus if I have a process P running which defines a variable say VAR, the scope of VAR is limited to only process P. Suppose that during the run of the process P, it creates a child process called Q, by default, Q will not get access to the variable VAR since it is out of scope. This is basically a security mechanism in play. However, we would want to share variables across to child processes. In this case, we use the export command. If I say export VAR=<VAR VALUE>, process P and Q can now access VAR.
To put things in Hyperion perspective, P is your shell script that calls the startMaxl.sh and startMaxl.sh is now your process Q. VAR can be the timestamp entry generated by process P for use by Q.
The below snapshot shows me getting a timestamp entry for the system date.
 I now create a substitution variable called REVENUE_DATA_EXPORT which will have the file name of the export that I want to run. The below snapshots show me creating this substitution variable.


The next snapshot shows a sample shell script that I have created for my environment.

The next snippet shows the MAXL script created by me for setting the substitution variable.
 On running the shell script, the MAXL executes successfully as shown in the below snapshot.
 Observe that in the above snapshot, I have set the variable to be equal to the timestamp entry. I update this to be equal to the value of the FILENAME from the shell script.
I now create a calculation script to export the database from the REVENUE application as shown in the below snapshot. I am basically going to the level 0 of the data and exporting it out. However, in place of a file name, I am using the substitution variable REVENUE_DATA_EXPORT as the filename for the target export.
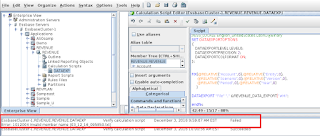 Observe the message panel in the above snapshot. Initially, the script verification failed giving me an error as follows: -
Error: 1012004 Invalid member name [03_12_16_095850.txt]
This was funny since somehow the Essbase calculation script was somehow trimming my variable name.
The below snapshot shows the variable being set by the MAXL script.
 But, its actually an interesting error and the fix was quite simple. I had set my variable name as “REVENUE_DATA_EXPORT-03_12_16_095850.txt”. Now observe that between the name of the file and the timestamp I had put a minus sign. Now, a calculation script is similar in syntax and semantics to any programming language like Java or HTML. Now, the specialty of any language is that to identify tokens we make use of delimiters. English uses a full stop, comma, etc. and our beloved calculation script treats +,-,*,/ as delimiters. This – was causing the filename to be split into two parts. I replaced it with an underscore and the script worked perfectly.
Now from a design perspective, it means that the script can behave in different ways based on what value you set. In some cases, it would work while in some it may not. This is unpredictable. So should be used after examining all the pros and cons. The second thing is that I personally do not like spaces in file names since the spaces need to be escaped when doing further manipulation.
The below snapshot shows the updated variable setting where I am using underscore.
 The calculation script validates successfully as shown in the below snapshot.
 The below couple of snapshots shows me running the script after like a few seconds interval.


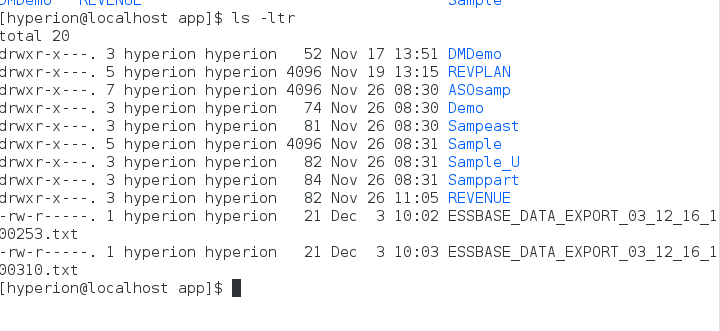
I observed that there was no data in the application and so I loaded some numbers in the application. Now I check the app folder for the files of the data export which is as shown in the below snapshot.
 A simple cat of the file is as shown in the below snapshot.
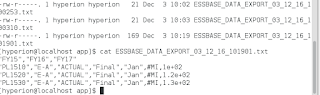 Now, if you schedule the script on a nightly basis, you have an automated backup of the level 0 data in Essbase all done by the script. If you fancy scripting a bit more, you can do all the magic like moving it to a folder, compressing it and all…
So let’s begin…
In this blog, we would be creating a timestamped data export file… I personally like timestamped export file since the chances of two processes generating the same timestamp is a quite rare… And when you consider automated processes that generate the timestamps for you, it is very well impossible that you will generate the same timestamp entry on multiple runs.
The below snapshot shows me creating a variable called sibin (pardon me for lack of imagination) and setting its value using the export command.

To put things in Hyperion perspective, P is your shell script that calls the startMaxl.sh and startMaxl.sh is now your process Q. VAR can be the timestamp entry generated by process P for use by Q.
The below snapshot shows me getting a timestamp entry for the system date.


The next snapshot shows a sample shell script that I have created for my environment.

The next snippet shows the MAXL script created by me for setting the substitution variable.


I now create a calculation script to export the database from the REVENUE application as shown in the below snapshot. I am basically going to the level 0 of the data and exporting it out. However, in place of a file name, I am using the substitution variable REVENUE_DATA_EXPORT as the filename for the target export.

Error: 1012004 Invalid member name [03_12_16_095850.txt]
This was funny since somehow the Essbase calculation script was somehow trimming my variable name.
The below snapshot shows the variable being set by the MAXL script.

Now from a design perspective, it means that the script can behave in different ways based on what value you set. In some cases, it would work while in some it may not. This is unpredictable. So should be used after examining all the pros and cons. The second thing is that I personally do not like spaces in file names since the spaces need to be escaped when doing further manipulation.
The below snapshot shows the updated variable setting where I am using underscore.


I observed that there was no data in the application and so I loaded some numbers in the application. Now I check the app folder for the files of the data export which is as shown in the below snapshot.