Well, in this blog, I would be talking about deleting a
Planning application manually. First of all, standard disclaimers. This is the
method of last resort and is not advised by me. It should be done only if all
other options are exhausted.
This is me creating a data source for a Planning
application.
The next snapshots show me creating a Planning application
against the HYPPLAN2 data source.
The above snapshot shows that the Planning application has
been created successfully.
Now, lets go about tactically nuking the application. We are
now going to delete the Planning application manually.
First step that we need to do is delete the Planning Essbase
application as shown in the next snapshot.
Once the application has been deleted from the EAS console, we delete the application from the Hyperion Shared Services as shown in the next snapshot.
The above snapshot shows the application has been deleted
successfully from the Hyperion Shared Services.
Once the application has been deleted from EAS console and
Shared Services Console, we will stop the Hyperion services. This is shown in
the next couple of snapshots.
Now that the Hyperion services have been stopped, we log
into the Planning administration database schema. We would be updating a couple
of tables in the schema.
Query the HSPSYS_APPLICATION table. Delete the entry for the
Plan2 application using the APP_ID as reference as shown in the next couple of
snapshots.
(The APP_ID is important to note since we would be needing
it later in the subsequent queries.)
The above snapshot shows the HSPSYS_APPLICATION table after
deleting the entry for the Plan2 app.
If you are using a clustered environment, then delete all
the records for the APP_ID used above from the HSPSYS_APP_CLUSTER_DTL table.
Since I am not using a clustered environment, this table is
empty for me as shown in the below snapshot.
The next step would be to delete the application properties
from the HSPSYS_PROPERTIES table for the APP_ID.
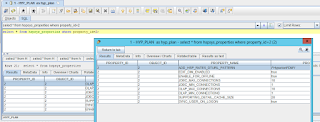
The contents of the HSPSYS_PROPERTIES table is as shown in
the below snapshots. Observe that it has the list of properties for APP_ID 1
and 2.
Delete the properties for APP_ID =2 from the
HSPSYS_PROPERTIES table.
The above snapshot shows the query used to delete the
records. The HSPSYS_PROPERTIES table after deleting the data is as shown in the
below snapshot.
The last step to do is update the HSPSYS_DATASOURCE TABLE to
indicate that the data source is free to be used. This can be done by setting
the APP_ID field to -1 in the table.
The below snapshots show the contents of the
HSPSYS_DATASOURCE table before and after updating the APP_ID field.
We now start the Hyperion services.
Once Hyperion services are started and I connect to the Workspace,
I only see one Planning application called EXPREP as shown in the below
snapshot…
The next snapshot shows the HYPPLAN2 data source available
for next Planning application.
There is a catch here however:-
If you have metadata in the application and want to delete it as well, then you may either need to truncate the tables in the HYPPLAN2 schema or drop the schema.
If you have truncated the table, the rest of the process can be run as listed above.
However, if you have dropped the schema, instead of updating the HSPSYS_DATASOURCE table and setting the value of APP_ID to -1, you need to delete the entry from the table.


You still have the tables in the Planning application repository that were not deleted. You either need to delete the DB or schema or use a script to drop the tables.
ReplyDeleteHi Lawrence, you are correct... Actually, I was planning to mess it up a bit more further by showing what happens to the metadata.
DeletePlus, if you delete the Planning schema, you need to delete the entry from the data source table since its no longer there...